 By Emily Parker
Updated November 2026
A picture chore chart template lets young children see their jobs instead of reading them, which means fewer “what do I do now?” questions and more tasks finished without you hovering. In this guide you will pick a simple layout, choose clear images for each chore, print and assemble the chart, and set up a daily check-off routine. The whole process takes about an hour on a weeknight.
Step 1: Pick a Layout That Matches Your Child’s Reading Level
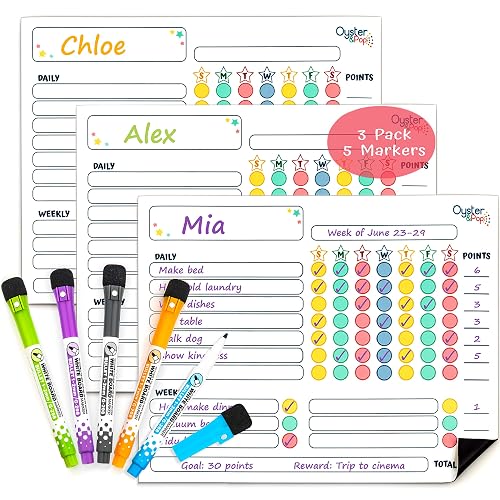
Most picture charts use a grid. Chores run down the left side in rows, and days of the week run across the top in columns. For children who cannot read yet, skip the words for days and use a sun, moon, or simple dot count instead. Limit each chart to four to six chores so the child can see the whole list at a glance. If you already have a printable weekly layout you like, you can adapt it. Our guide to a Printable Weekly Chore Chart Template: 7 Steps to a Setup That Works covers grid sizing in more detail.
Shopping for one? See our guide: Free Printable Chore Chart with Pictures PDF: 5 Best Picks for Busy Families.
Step 2: Choose Images That Show One Action Each
The best chore pictures show a single, obvious action. A toothbrush means brush teeth. A bed means make the bed. A hamper means put dirty clothes away. Avoid icons that mix two tasks, like a sink with a sponge, because a child may not know which part is the job. Use the same visual style for every image so the chart looks consistent. Clip art from a reputable library or photos of your child doing each task both work well. Photos of the child are especially motivating for preschoolers.
Step 3: Build and Print the Chart
Create the chart in any word processor or a free design tool. Set the page to landscape, add a grid, and place one image in each row’s first cell. Leave a blank box for each day. Print on cardstock if you can, since it holds up better than standard paper. Check the printed size on the wall where it will hang. Children should be able to reach the check-off boxes without a step stool.
Tools You Will Need
- A word processor or design app with table and image tools
- Cardstock or heavy paper
- Clear self-adhesive laminating sheets or a laminator
- Dry-erase markers or stickers for check-offs
- Painter’s tape or small hooks for hanging
Step 4: Laminate and Add a Check-Off System
Laminating lets your child mark completed chores with a dry-erase marker and wipe the chart clean each week. Stickers work well too, but they can peel off. Put a small check-off box or star sticker in each day’s cell. For very young children, add a simple reward row, such as five stickers earns a small treat. Keep rewards simple and tied to effort, not perfection.
Step 5: Walk Through the Chart Together
Spend five minutes the first morning showing your child each picture and doing the task with them. Use the same words every time, like “brush teeth” or “feed the cat,” so the chart and your voice match. Repetition for the first week is what turns the chart into a habit. You can read more about setting expectations in our article on Preschool Chore Chart Template: 6 Steps to a Simple Setup Your Child Will Use.
Step 6: Review and Adjust Each Week
At the end of each week, look at which pictures were skipped most often. Either the task is too hard, the picture is unclear, or the chore needs a better time slot. Swap the image or move the chore to a different time of day. Families with older kids often combine picture charts with a rotating schedule. If that fits your home, see Rotating Chore Chart Template: 7 Steps to a Setup That Keeps Everyone Working.
Recommended gear
A laminator makes the chart reusable for months, and a set of dry-erase markers in several colors lets each child have their own. A roll of painter’s tape holds the chart in place without damaging walls. View on Amazon View on Amazon View on Amazon
Common Mistakes to Avoid
- Using too many chores at once. Four to six is enough for children under seven.
- Choosing pictures that look alike, which causes confusion.
- Hanging the chart too high for the child to reach.
- Changing the chores every few days before the habit forms.
- Forgetting to praise effort, not just completed boxes.
FAQ
Where can I find free pictures for a chore chart?
Many free clip art libraries offer simple icons for household tasks. Check the license before using them on a chart you plan to sell or share publicly. Photos of your own child doing each chore are another free option.
What age is a picture chore chart good for?
Picture charts work well from about age two or three through early elementary school. Older children can move to a word-based chart with checkboxes once they read fluently.
How long should I use the same chart?
Keep the same chart for at least three to four weeks so the routine becomes automatic. Update the chores only after you have reviewed which tasks are being done consistently.
Conclusion
A picture chore chart template gives young children a clear, visual routine they can follow with less help from you. Choose a simple layout, use one clear image per chore, and laminate the chart so it lasts. Review it weekly and adjust the pictures or chores as your child grows.
Related reading
- Word Chore Chart Template: 7 Steps to a Printable Setup Your Family Will Use
- Weekly Chore Chart Template: A Step-by-Step Setup for Busy Moms
Ready to choose one?
About Emily Parker
Emily Parker is part of our editorial team and reviews and edits our busy-mom life guides, checking product details against manufacturer specifications and owner feedback.