As an Amazon Associate I earn from qualifying purchases. This page may contain affiliate links.
A DIY family organization center is a single spot in your home where calendars, school papers, keys, chore lists and mail all live. In this guide you will plan the location, choose the right materials, build or assemble the core pieces, and set up simple habits that keep the station working after the first week. Most families can finish the basic version in a weekend with a modest set of tools.
Why a Family Organization Center Works
Clutter usually spreads because there is no clear home for incoming items. Permission slips land on the counter, coats pile on a chair, and the calendar lives in three different phones. A central station gives every household item one landing zone, so you spend less time searching and less time reminding people where things go.
Shopping for one? See our guide: Family Support Organization Burlington County NJ: 9 Best Options Compared.
A good center does three jobs. It holds information (calendars, lists, notes), it holds physical items that need to be grabbed on the way out the door (keys, bags, shoes), and it holds things waiting for action (mail, forms, bills). If you design for those three jobs, the station stays useful instead of becoming a dumping ground.
Step 1: Choose the Right Location
The best spot is one your family already passes through on the way in or out. A wall near the back door, a hallway nook, or the end of the kitchen counter all work well. Avoid tucked-away corners, because a station nobody sees is a station nobody uses.
Measure the wall space before you buy anything. You need at least 36 inches of width for a basic setup with a small command area, a row of hooks and a shallow shelf. If you have less, a vertical layout with a narrow cabinet and wall-mounted hooks can fit into 18 to 24 inches.
Check that the spot has power if you plan to use a charging station, a printer or a digital display. Keep it at least three feet from heat sources such as radiators or ovens so paper and electronics stay safe.
Step 2: Plan the Zones Before You Buy
Sketch the wall on paper at actual size. Divide it into four zones:
- Information zone: the family calendar, a whiteboard or cork board, and a daily task list.
- Launch zone: hooks for bags and coats, a bench or shoe tray, and a bin for keys and wallets.
- Action zone: an inbox tray for papers that need signing, bills to pay, and forms to return.
- Charging zone: a power strip mounted out of sight with outlets for phones, tablets and a small lamp.
Keep the information zone at eye level, roughly 50 to 60 inches from the floor to the center of the calendar. Put the launch zone lower so younger children can reach their hooks. Place the action zone between the two so papers move from the door to the inbox without crossing traffic.
Step 3: Gather Materials and Tools
Most DIY stations need only basic supplies. Use this checklist before you start:
- Stud finder and level
- Drill with bits for wood, drywall and masonry if your wall needs them
- Wall anchors rated for the weight of each item
- Screws (typically 2 to 3 inches long for shelves and hooks)
- Pencil and painter’s tape for marking layout
- Shelf or cabinet unit, hooks, inbox tray and bins
- Whiteboard or cork panel sized to your information zone
- Surge-protected power strip and cable clips
Always mount heavy items into studs. Hollow-wall anchors are fine for lightweight hooks and trays, but a loaded shelf of backpacks needs solid fastening. Manufacturers usually print a maximum load on the packaging or product page. Stay well under that figure, especially for shelves that will hold books or wet coats.
Step 4: Build and Mount the Core Pieces
Mark the Layout
Tape the outline of each zone on the wall. Stand back and check the spacing from the doorway and from the floor. Adjust the tape until the layout feels natural before you drill a single hole.
Install the Anchor Items First
Mount the largest item, usually a shelf or cabinet, first. Use the level on every pass. Once it is secure, add the information board above it and the hook rail beside it. Finish with the inbox tray and charging strip.
Label Everything
Add simple labels to each bin and hook. Young readers can match a picture of a backpack to a hook, and adults can see at a glance where a folder belongs. Clear labels reduce the number of times someone asks where something goes.
Step 5: Set Up the Daily Routine
A station only works if people use it, so build small habits around it:
- Each evening, the last adult out of the house checks the action tray and clears one item.
- Each Sunday, update the weekly calendar and move any new events to every person’s schedule.
- Each morning, glance at the information board before leaving so nobody forgets a practice or a permission slip.
For ideas on structuring the paperwork side, see Using a Family Planner to Keep Track of It All. If you want the calendar to live on a screen as well as the wall, Setting Up a Family Calendar Everyone Can Follow walks through matching both.
Recommended gear
Choose gear that suits the size of your wall and the number of people using the station.
- Wall-mounted cubby organizer: keeps shoes, mail and small items sorted without taking floor space. View on Amazon
- Magnetic dry-erase calendar board: gives the information zone a large writing surface that families can update in marker. View on Amazon
- Metal wall-mount key hook rail: a sturdy rail with hooks for keys, bags and lanyards. View on Amazon
- Surge-protected in-wall or under-shelf power strip: hides cords while giving the charging zone enough outlets. View on Amazon
Common Mistakes
- Choosing a spot nobody passes. A station in a seldom-used room gets ignored. Put it where the family already walks.
- Overfilling the zones. If the inbox tray overflows by Wednesday, the system is too small or the review habit is missing. Scale the zone up or add a second tray for finished items.
- Skipping the stud. Mounting a loaded shelf on drywall anchors alone is a common cause of pulled-down fixtures.
- Using too many colors or labels. A busy wall looks cluttered even when it is organized. Stick to two or three colors and clear fonts.
- Setting it up and forgetting it. Review the station once a month. Remove outgrown items, update hook labels as children grow, and retire old calendars.
Tips for Making It Last
- Keep one pen, one pair of scissors and a small stapler in a cup near the inbox.
- Put a basket for returns beside the door so library books and borrowed items have a single exit point.
- Use a different color for each family member on the calendar. Children can learn to read their own color early.
- Build the station in phases. Start with the calendar and hooks, then add the inbox and charging zone once the first two are working.
FAQ
How much wall space do I need for a family organization center?
A basic setup with a calendar, a hook rail and a shallow shelf needs about 36 inches of width. A narrower vertical layout can fit into 18 to 24 inches if you use wall-mounted pieces.
What height should the family calendar be?
Center the main calendar at about 50 to 60 inches from the floor so most adults can read it without bending. Place children’s hooks lower so they can reach them independently.
Can I build the station in a rented home?
Often yes, but check your lease first. Freestanding units or pieces mounted with removable adhesive hooks can avoid wall damage. Ask your landlord before drilling into plaster or tile.
How do I keep children using the system?
Give each child a personal hook and a labeled bin, and check the station together for the first few weeks. Short, consistent routines work better than long lectures.
What if my family is too large for one station?
Larger households often add a second small zone near the kitchen or a bedroom for school materials. Keep the main command station in one place so the calendar stays unified.
How often should I clean out the station?
Clear the action tray at least once a week and do a deeper review monthly. Remove expired forms, old menus and outgrown items.
Do I need a digital calendar as well as a wall calendar?
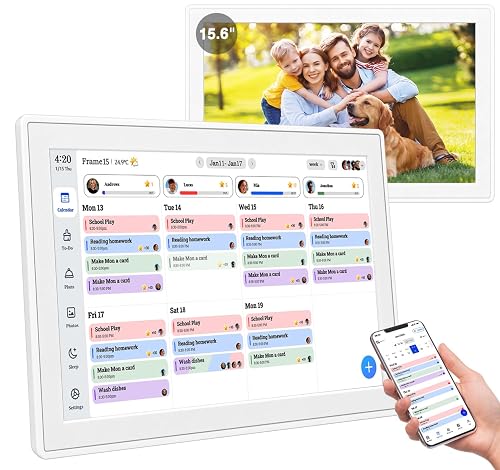
Not necessarily, but many families sync a shared digital calendar to the wall board for quick reference. Pick the format your household checks most often and make that the source of truth.
Is it safe to mount heavy shelves in a home with children?
Mount heavy shelves into studs and follow the maximum load listed by the manufacturer. Anchor tall cabinets to the wall so they cannot tip. If you are unsure about your wall type or load capacity, consult a qualified contractor or handyman.
Conclusion
A DIY family organization center brings your calendar, keys, papers and daily launch habits into one reliable spot. Pick a location people already pass, plan four clear zones, mount the pieces securely, and add a short daily routine. Start small, review it monthly, and adjust as your family’s needs change.